 VC++操作指南.docx
- 文档编号:9894752
- 上传时间:2023-02-07
- 格式:DOCX
- 页数:23
- 大小:256.04KB
VC++操作指南.docx
《VC++操作指南.docx》由会员分享,可在线阅读,更多相关《VC++操作指南.docx(23页珍藏版)》请在冰豆网上搜索。

VC++操作指南
VC++6.0应用步骤及例题
一、VC++6.0Win32应用步骤
第一步:
打开MicrosoftVisualC++6.0运行软件;
第二步:
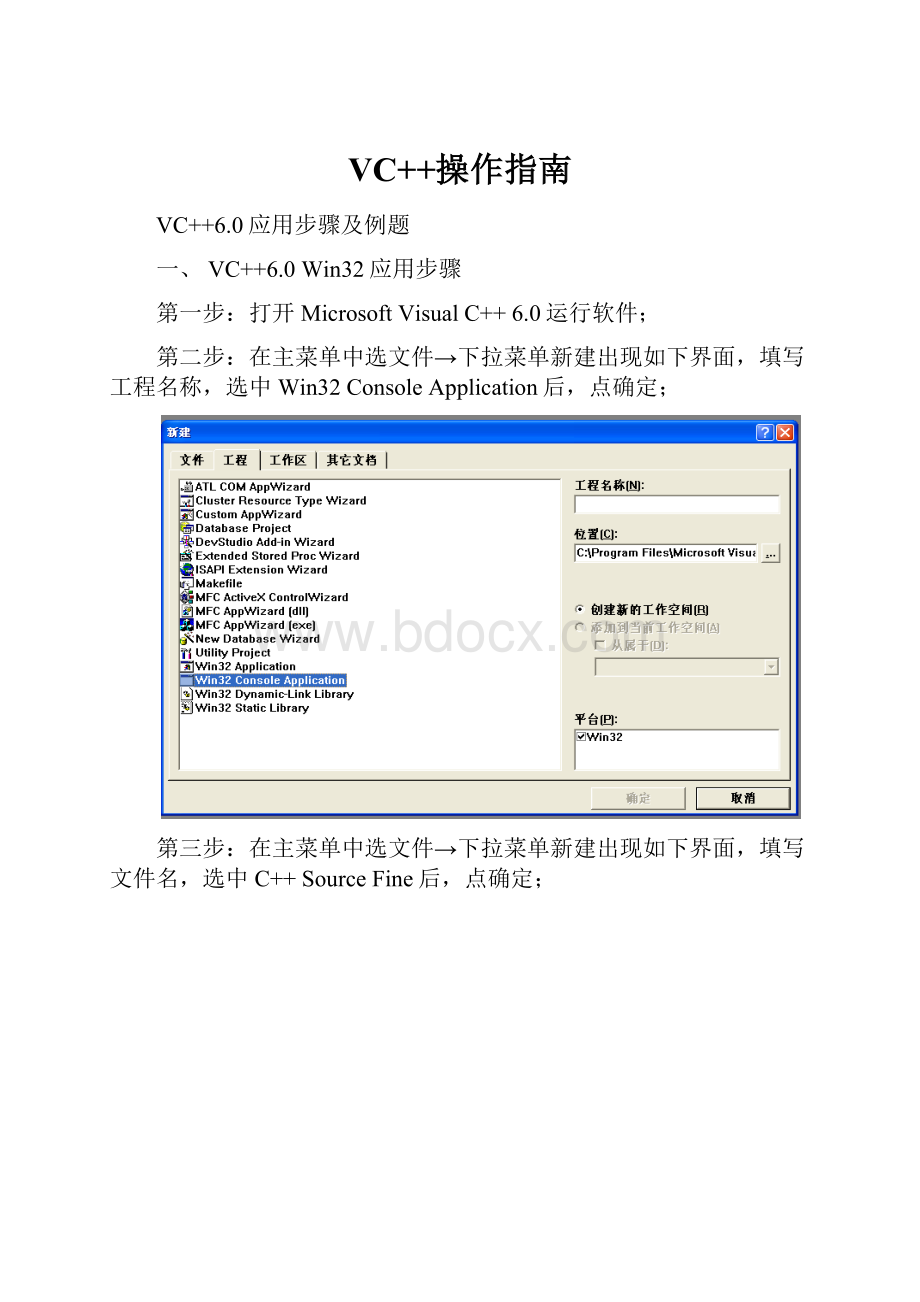
在主菜单中选文件→下拉菜单新建出现如下界面,填写工程名称,选中Win32ConsoleApplication后,点确定;
第三步:
在主菜单中选文件→下拉菜单新建出现如下界面,填写文件名,选中C++SourceFine后,点确定;
第四步:
在空白工作区编程,编译、链接、运行程序。
例题1:
#include
usingnamespacestd;
voidmain()
{
intarray[10];
inti,j,min;
cout<<"请输入数值"< for(i=0;i<10;i++) { cin>>array[i]; cout< min=array[0]; for(j=1;j<10;j++) { if(min>array[j]) min=array[j]; } cout<<"min="< 运行结果: 二、VC++6.0MFC应用步骤 第一步: 打开MicrosoftVisualC++6.0运行软件; 第二步: 在主菜单中选文件→下拉菜单新建出现如下界面,填写工程名称,选中MFCAppWizard【exe】后,点确定; 第三步: 第二步点确定后出现如下界面,点下一步; 第四步: 第三步点下一步后出现如下界面,点下一步; 第五步: 第四步点下一步后出现如下界面,点下一步; 第六步: 第五步点下一步后出现如下界面,点下一步; 第七步: 第六步点下一步后出现如下界面,点下一步; 第八步: 第七步点下一步后出现如下界面,点完成; 第九步: 第八步点完成后出现如下界面,点确定; 在以上步骤完成后按以下例题步骤做,红色程序段是需要添加的程序。 例2.在窗口画一个矩形并在矩形内显示文本 ClassView->CView中打开OnDraw添加代码 voidCDView: : OnDraw(CDC*pDC) { CDDoc*pDoc=GetDocument(); ASSERT_VALID(pDoc); //TODO: adddrawcodefornativedatahere CRectrectClient,rectTitle; intnWidth=240; intnHeight=40; GetClientRect(&rectClient); rectTitle.left=(rectClient.Width()-nWidth)/2; rectTitle.top=(rectClient.Height()-nHeight)/2; rectTitle.right=rectTitle.left+nWidth; rectTitle.bottom=rectTitle.top+nHeight; pDC->Rectangle(rectTitle); pDC->TextOut(rectTitle.left+10,rectTitle.top+10,"wangxiaoming: Hellomissliu"); } 运行结果: 例3.窗口显示字符串“Greetings! ” 第一步: HeaderFile中打开CgreetDoc.h添加代码 classCGreetDoc: publicCDocument {char*m_Message; public: char*GetMessage() {returnm_Message;} protected: //createfromserializationonly 第二步: SourceFile中打开CgreetDoc.cpp添加代码 CGreetDoc: : CGreetDoc() { //TODO: addone-timeconstructioncodehere m_Message=”Greetings! ”; } 第三步: SourceFile中打开CgreetView.cpp添加代码 voidCGreetView: : OnDraw(CDC*pDC) { CGreetDoc*pDoc=GetDocument(); ASSERT_VALID(pDoc); //TODO: adddrawcodefornativedatahere RECTClientRect; GetClientRect(&ClientRect); pDC->DrawText (pDoc->GetMessage(),//obtainthestring -1, &ClientRect, DT_CENTER|DT_VCENTER|DT_SINGLELINE);} 运行结果: ****后面几道题同学们自己运行一下,有问题可以答疑! ! 例4.在视图窗口绘制直线 第一步: HeaderFile中打开CLiu1View.h添加代码 classCLiu1View: publicCView {protected: CStringm_ClassName; intm_Dragging; HCURSORm_HCross; CPointm_PointOld; CPointm_PointOrigin; protected: //createfromserializationonly 第二步: SourceFile中打开CLiu1View.cpp添加代码 CLiu1View: : CLiu1View() { //TODO: addconstructioncodehere m_Dragging=0; m_HCross=AfxGetApp()->LoadStandardCursor(IDC_CROSS); } CLiu1View: : ~CLiu1View() 第三步: 添加OnLButtonDown函数: (1)选View菜单->ClassWizard出现 (2)Classname选CLiu1View (3)ObjectIDs选CLiu1View (4)Message选WM_LBBUTTONDOWN (5)单击AddFunction按钮 (6)单击EditCode在生成的框架中添加相应代码 voidCLiu1View: : OnLButtonDown(UINTnFlags,CPointpoint) { //TODO: Addyourmessagehandlercodehereand/orcalldefault m_PointOrigin=point; m_PointOld=point; SetCapture(); m_Dragging=1; RECTRect; GetClientRect(&Rect); ClientToScreen(&Rect); : : ClipCursor(&Rect); CView: : OnLButtonDown(nFlags,point); } 第四步: 添加OnMouseMove函数: voidCLiu1View: : OnMouseMove(UINTnFlags,CPointpoint) { //TODO: Addyourmessagehandlercodehereand/orcalldefault : : SetCursor(m_HCross); if(m_Dragging) {CClientDCClientDC(this); ClientDC.SetROP2(R2_NOT); ClientDC.MoveTo(m_PointOrigin); ClientDC.LineTo(m_PointOld); ClientDC.MoveTo(m_PointOrigin); ClientDC.LineTo(point); m_PointOld=point;} CView: : OnMouseMove(nFlags,point); } 第五步: 添加OnLButtonUp函数 voidCLiu1View: : OnLButtonUp(UINTnFlags,CPointpoint) { //TODO: Addyourmessagehandlercodehereand/orcalldefault if(m_Dragging) {m_Dragging=0; : : ReleaseCapture(); : : ClipCursor(NULL); CClientDCClientDC(this); ClientDC.SetROP2(R2_NOT); ClientDC.MoveTo(m_PointOrigin); ClientDC.LineTo(m_PointOld); ClientDC.SetROP2(R2_COPYPEN); ClientDC.MoveTo(m_PointOrigin); ClientDC.LineTo(point);} CView: : OnLButtonUp(nFlags,point); } 例5.单击鼠标左键,弹出对话框显示鼠标所在点的坐标;按下键盘任意一个键,显示用户所 第一步: 为鼠标设定消息绑定机制,编辑OnLButtonDown函数,在CView.cpp加入代码 voidCMyView: : OnLButtonDown(UINTnFlags,CPointpoint) { //TODO: Addyourmessagehandlercodehereand/orcalldefault CStringstrDisplay; strDisplay.Format("X=%d,Y=%d",point.x,point.y); MessageBox(strDisplay); CView: : OnLButtonDown(nFlags,point); } 第二步: 为鼠标设定消息绑定机制,编辑OnKeyDown函数,在CView.cpp加入代码 voidCMyView: : OnKeyDown(UINTnChar,UINTnRepCnt,UINTnFlags) { //TODO: Addyourmessagehandlercodehereand/orcalldefault CStringstrDisplay; strDisplay.Format("用户按下键%c,键值为%d",nChar,nChar); MessageBox(strDisplay); CView: : OnKeyDown(nChar,nRepCnt,nFlags); } 例6.单击鼠标左键画圆并弹出对话框,显示圆在视图窗口中矩形的里面还是外面 第一步: 在CView.h中添加代码 //}}AFX_VIRTUAL //Implementation public: CRectm_rect; public: virtual~CMy2View(); 第二步: 在CView.cpp中添加代码 CMy2View: : CMy2View(): m_rect(0,0,200,200) { //TODO: addconstructioncodehere } CMy2View: : ~CMy2View() CMy2View: : ~CMy2View() voidCMy2View: : OnDraw(CDC*pDC) { CMy2Doc*pDoc=GetDocument(); ASSERT_VALID(pDoc); //TODO: adddrawcodefornativedatahere pDC->Rectangle(m_rect); } 第三步: 添加OnLButtonDown函数: voidCMy2View: : OnLButtonDown(UINTnFlags,CPointpoint) {CDC*pDC=this->GetDC(); if(m_rect.PtInRect(point)) { pDC->Ellipse(point.x-5,point.y-5,point.x+5,point.y+5); MessageBox("Inthebox"); } else { pDC->Ellipse(point.x-5,point.y-5,point.x+5,point.y+5); MessageBox("Outofthebox"); } //TODO: Addyourmessagehandlercodehereand/orcalldefault CView: : OnLButtonDown(nFlags,point); } 例7.计数器: 单击鼠标左键开始记数,单击鼠标右键停止记数 第一步: 在CView.h中添加代码 classCMy3View: publicCView { protected: //createfromserializationonly CMy3View(); DECLARE_DYNCREATE(CMy3View) //Attributes intm_iCount; 第二步: 在CView.cpp中添加代码 CMy3View: : CMy3View() { //TODO: addconstructioncodehere m_iCount=0; } CMy3View: : ~CMy3View() { } voidCMy3View: : OnDraw(CDC*pDC) { CMy3Doc*pDoc=GetDocument(); ASSERT_VALID(pDoc); //TODO: adddrawcodefornativedatahere CStringstrDisplay; strDisplay.Format("当前值: %d",m_iCount); pDC->TextOut(10,10,strDisplay); } 第三步: 添加OnLButtonDown函数 voidCMy3View: : OnLButtonDown(UINTnFlags,CPointpoint) { //TODO: Addyourmessagehandlercodehereand/orcalldefault m_iCount=0;//保证计数器的重置 SetTimer(1,100,NULL); CView: : OnLButtonDown(nFlags,point); } 第四步: 添加OnRButtonDown函数 voidCMy3View: : OnRButtonDown(UINTnFlags,CPointpoint) { //TODO: Addyourmessagehandlercodehereand/orcalldefault KillTimer (1);//删除定时器 CView: : OnRButtonDown(nFlags,point); } 第五步: 添加OnTimer函数 voidCMy3View: : OnTimer(UINTnIDEvent) { //TODO: Addyourmessagehandlercodehereand/orcalldefault m_iCount++; CRectrectReDraw(10,10,120,30); InvalidateRect(rectReDraw,TRUE); CView: : OnTimer(nIDEvent); } 例8.显示一张位图 第一步: 修改视图类的定义(头文件),加入四个变量的定义 classCMy1View: publicCView {//定义CBitmap类对象以及位图的显示参数变量 CBitmapm_Bitmap; floatm_fTimes; intm_nHeight; intm_nWidth; protected: //createfromserializationonly CMy1View(); DECLARE_DYNCREATE(CMy1View) //Attributes 第二步: 修改视图类的构造函数 CMy1View: : CMy1View() { //TODO: addconstructioncodehere //载入位图资源,读位图信息 BITMAPBM; m_Bitmap.LoadBitmap(IDB_BITMAP1); m_Bitmap.GetBitmap(&BM); m_nWidth=BM.bmWidth; m_nHeight=BM.bmHeight; m_fTimes=1.0; } CMy1View: : ~CMy1View() { }//IDB_BITMAP1是VC++先使用缺省标识符(生成的第一个位图为IDB_BITMAP1,生成的第二个位图为IDB_BITMAP2,等等) 用位图编辑器设计位图步骤: 选择Insert->Resource->Bitmap->NewBitmap 设计新位图时,也可以使用引用以文件扩展名为BMP或DIB存成的位图,步骤: Insert->Resource->Bitmap->Import,选位图存盘的文件名,引入的位图出现在VC++位图编辑器中,可以编辑 第三步: 修改视图类的OnDraw函数,显示位图 voidCMy1View: : OnDraw(CDC*pDC) { CMy1Doc*pDoc=GetDocument(); ASSERT_VALID(pDoc); //TODO: adddrawcodefornativedatahere CDCMemDC; MemDC.CreateCompatibleDC(NULL); MemDC.SelectObject(&m_Bitmap); pDC->StretchBlt(0,0,(int)(m_nWidth*m_fTimes), (int)(m_nHeight*m_fTimes), &MemDC,0,0,m_nWidth,m_nHeight,SRCCOPY); } 第四步: MFC的类向导生成菜单消息处理函数,加入代码 //原样显示 voidCMy1View: : OnBestfit() { //TODO: Addyourcommandhandlercodehere m_fTimes=1.0; Invalidate(); } voidCMy1View: : OnUpdateBestfit(CCmdUI*pCmdUI) { //TODO: AddyourcommandupdateUIhandlercodehere pCmdUI->SetCheck(m_fTimes==1.0); } //缩小图像 voidCMy1View: : OnShrink() { //TODO: Addyourcommandhandlercodehere m_fTimes=0.5; Invalidate(); } voidCMy1View: : OnUpdateShrink(CCmdUI*pCmdUI) { //TODO: AddyourcommandupdateUIhandlercodehere pCmdUI->SetCheck(m_fTimes==0.5); } //放大图像 voidCMy1View: : OnZoomout() { //TODO: Addyourcommandhandlercodehere m_fTimes=2.0; Invalidate(); } voidCMy1View: : OnUpdateZoomout(CCmdUI*pCmdUI) { //TODO: AddyourcommandupdateUIhandlercodehere pCmdUI->SetCheck(m_fTimes==2.0); } 例9. 第一步: 修改文档类(Doc.h)的定义(头文件), #defineMAX_BUBBLE250 classCMy2Doc: publicCDocument { protected: //createfromserializationonly CMy2Doc(); DECLARE_DYNCREATE(CMy2Doc) //Attributes public: CRectm_rectBubble[MAX_BUBBLE]; intm_nBubbleCount; //Operations 第二步: 修改文档类的OnNewDocument函数,对变量进行初始化 BOOLCMy2Doc: : OnNewDocument() { if(! CDocument: : OnNewDocument()) returnFALSE; m_nBubbleCount=0; //TODO: addreinitializationcodehere //(SDIdocumentswillreusethisdocument) returnTRUE; } 第二步: 修改文档类(Doc.cpp)的: Serialize函数 voidCMy2Doc: : Serialize(CArchive&ar) { if(ar.IsStoring()) { //TODO: addstoringcodehere ar< for(inti=0;i ar< } else { //TODO: addloadingcodehere ar>>m_nBubbleCount; for(inti=0;i ar>>m_rectBubble[i]; } } 第三步: 修改视图类(CView.cpp)的OnDraw函数 voidCMy2View: : OnDraw(CDC*pDC) { CMy2Doc*pDoc=GetDocument(); ASSERT_VALID(pDoc); //TODO: adddrawcodefornativedatahere for(inti=0;i
- 配套讲稿:
如PPT文件的首页显示word图标,表示该PPT已包含配套word讲稿。双击word图标可打开word文档。
- 特殊限制:
部分文档作品中含有的国旗、国徽等图片,仅作为作品整体效果示例展示,禁止商用。设计者仅对作品中独创性部分享有著作权。
- 关 键 词:
- VC 操作 指南
 冰豆网所有资源均是用户自行上传分享,仅供网友学习交流,未经上传用户书面授权,请勿作他用。


 《Java程序设计》考试大纲及样题试行.docx
