 timesten在虚拟机上的安装步骤.docx
- 文档编号:28153938
- 上传时间:2023-07-08
- 格式:DOCX
- 页数:12
- 大小:18.35KB
timesten在虚拟机上的安装步骤.docx
《timesten在虚拟机上的安装步骤.docx》由会员分享,可在线阅读,更多相关《timesten在虚拟机上的安装步骤.docx(12页珍藏版)》请在冰豆网上搜索。
timesten在虚拟机上的安装步骤
因为工作的需要,我编写了一份timesten的安装文档。
安装环境是RedHatAS564位的操作系统。
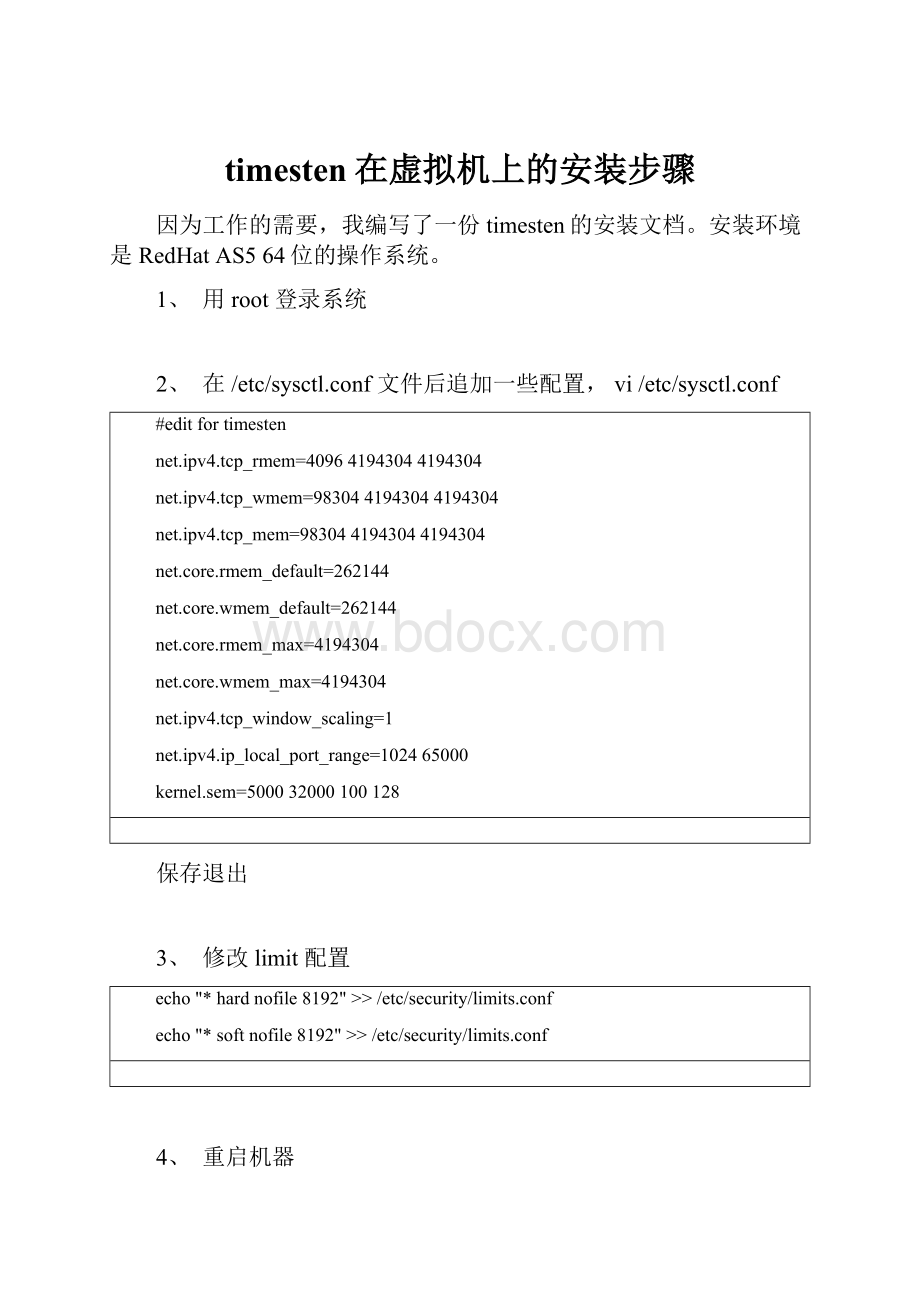
1、 用root登录系统
2、 在/etc/sysctl.conf文件后追加一些配置,vi/etc/sysctl.conf
#editfortimesten
net.ipv4.tcp_rmem=409641943044194304
net.ipv4.tcp_wmem=9830441943044194304
net.ipv4.tcp_mem=9830441943044194304
net.core.rmem_default=262144
net.core.wmem_default=262144
net.core.rmem_max=4194304
net.core.wmem_max=4194304
net.ipv4.tcp_window_scaling=1
net.ipv4.ip_local_port_range=102465000
kernel.sem=500032000100128
保存退出
3、 修改limit配置
echo"*hardnofile8192">>/etc/security/limits.conf
echo"*softnofile8192">>/etc/security/limits.conf
4、 重启机器
reboot
5、 建用户
useraddtimesten-d/timesten
6、 用passwd命令修改timesten用户的口令为timesten
7、 切换成timesten用户
su–timesten
8、 把tt70install.tar.gz放到/timesten目录下
9、 解压tt70install.tar.gz
tar-xvftt70install.tar.gz
10、 安装timesten
su-root
mkdir/etc/TimesTen/
chowntimesten:
timesten/etc/TimesTen/
su – timesten
cdinstall
./setup.sh
11、 选择产品是64位,还是32位,出现如下提示:
Ofthefollowingtwochoices:
[1]32-bitLinuxforx86
[2]64-bitLinuxforAMD64andIntelEM64Tprocessors
Whichplatformareyoucurrentlyrunning?
[2]
选择安装64位Linux版本,确认回车
12、 确认timesten实例名,出现如下提示
NOTE:
EachTimesTeninstallationisidentifiedbyauniqueinstancename.
Theinstancenamemustbeanon-nullalphanumericstring,notlonger
than255characters.
Pleasechooseaninstancenameforthisinstallation?
[tt70]
默认选择timesten的instance名字,直接回车,提示:
Instancenamewillbe'tt70'.
Isthiscorrect?
[yes]
默认回车
13、 选择安装产品,出现如下提示
Pleaseselectaproduct:
[1]OracleTimesTenIn-MemoryDatabase
[2]OracleTimesTenIn-MemoryDatabasewithCacheConnecttoOracle
Whichproductwouldyouliketoinstall?
[1]2
选择安装“OracleTimesTenIn-MemoryDatabasewithCacheConnecttoOracle”,输入2,确认回车
14、 选择安装组件,出现如下提示
Ofthethreecomponents:
[1]Client/ServerandDataManager
[2]DataManagerOnly
[3]ClientOnly
Whichwouldyouliketoinstall?
[1]
选择安装“Client/ServerandDataManager”,默认确认回车
15、 选择安装timesten的目录,出现如下提示
Wherewouldyouliketoinstallthett70instanceofTimesTen?
[/timesten]
选择/timesten,确认回车
16、 选择创建守护进程的主目录,出现如下提示
Wherewouldyouliketocreatethedaemonhomedirectory?
[/timesten/TimesTen/tt70/info]
默认回车,出现如下提示:
Thedirectory/timesten/TimesTen/tt70/infodoesnotexist.
Doyouwanttocreateit?
[yes]
提示目录不存在是否创建,默认选择yes,确认回车。
开始解压安装,提示如下
Installinginto/timesten/TimesTen/tt70...
Uncompressing...
17、 解压结束后,安装Demo程序,出现如下提示
TheTimesTenDemoapplicationscantakeupto64Mbytesofdiskspace.
Dependingonhowyoursystemisconfigured,youmaynotwanttocreatethe
DemoDataStoredirectoryinthedefaultlocation,
/timesten/TimesTen/tt70/info/DemoDataStore
WherewouldyouliketocreatetheDemoDataStoredirectory?
[/timesten/TimesTen/tt70/info]
默认回车确认,提示如下:
Creating/timesten/TimesTen/tt70/info/DemoDataStore...
18、 选择timesten守护进程的端口,出现如下提示
NOTE:
Allinstallationsthatreplicatetoeachothermustusethesamedaemon
portnumberthatissetatinstallationtime.Thedaemonportnumbercan
beverifiedbyrunning'ttVersion'.
Thedefaultportnumberis17001.
DoyouwanttousethedefaultportnumberfortheTimesTendaemon?
[yes]
默认选择17001端口,确认端口没有被占用[1],确认方法见脚注。
如果17001端口没有被占用的话,则默认回车确认,如果被占用,则输入no,回车,出现如下提示
PleaseenterauniqueportnumberfortheTimesTendaemon(
[]18001
输入一个没有被占用的端口,回车确认。
系统提示安装过程:
Processing/timesten/TimesTen/tt70/PERL/perl.tar...
19、 选择激活数据存储的控制权限,出现如下提示
Wouldyouliketoenabledatastoreaccesscontrol?
[no]yes
输入yes,回车确认,出现如下提示
Thedaemonlogwillbelocatedin/timesten/TimesTen/tt70/info
20、 选择timesten守护进程日志
Wouldyouliketospecifyadifferentlocationforthedaemonlog?
[no]yes
为方便管理,应该重新选择日志目录,输入yes,出现如下提示:
Wherewouldyoulikethedaemonlogtobewritten?
[/timesten/TimesTen/tt70/info]
在新的终端[2]里面,用timesten用户登录,建立目录
cd/timesten/TimesTen/tt70
mkdirlog
回到安装timesten的终端,输入新的目录
Wherewouldyoulikethedaemonlogtobewritten?
[/timesten/TimesTen/tt70/info]/timesten/TimesTen/tt70/log
回车确认,出现提示:
Areyousureyouwantthedaemonlogtobewrittento/timesten/TimesTen/tt70/log?
[yes]
默认回车,确认把日志写到新建的目录下
21、 输入ORACLE_HOME,出现如下提示
NOTE:
CacheConnecttoOraclerequirestheORACLE_HOMEenvironmentvariable.
IfyoucannotprovideavalidpathtoyourOracleinstallation,
youmustmodifythescript:
/timesten/TimesTen/tt70/bin/ttThunk
aswellasthedaemonoptionsfile:
/timesten/TimesTen/tt70/info/ttendaemon.options
whenyouhaveacquiredtheappropriatevalue.
CacheConnecttoOraclewillnotfunctionproperlywithout
ORACLE_HOMEdefinedinthesefiles.
Notethatyoucanaddorchangethisinstance'sORACLE_HOMEsetting
byrunning
WouldyouliketospecifyavalueforORACLE_HOME?
[yes]
默认回车确认,出现提示
PleaseenteravalueforORACLE_HOME(q=quit)?
[ ]
因为安装billing应用的时候,已经把oracle的客户端安装好,所以这里直接输入“/opt/oracle/product/10.2.0/db_1”
PleaseenteravalueforORACLE_HOME(q=quit)?
[ ]/opt/oracle/product/10.2.0/db_1
回车确认,系统提示:
Thefollowingvariableshavebeensetinthefile:
/timesten/TimesTen/tt70/bin/ttThunk
ORACLE_HOME=/opt/oracle/product/10.2.0/db_1
22、 激活CacheConnecttoOracleAdministrator,出现提示
WouldyouliketoenabletheCacheConnecttoOracleAdministrator?
[yes]
默认回车确认
23、 选择CacheConnecttoOracleAdministrator的端口,出现提示
WhatTCP/IPportnumberwouldyoulikeCacheConnecttoOracleAdministratortolistenon?
[18005]
安装程序会提示一个默认端口,按照前面的方法确认这个端口没有被占用,如果占用则选择别的端口,输入正确的端口号,回车确认,出现提示
NOTE:
ToaccesstheTimesTenCacheConnecttoOracleAdministrator
gototheurl:
http:
//localhost:
18005/cache
由于g++版本的原因,安装程序可能会提示
NOTE:
Itappearsthatyouarerunningversion4.1oftheg++
compiler.TimesTenshipswithmultiplesetsofclientlibrariesandserver
binaries:
onebuiltwithg++3.2.3,onewithg++3.4.6,andonewith
g++4.1.0.Theinstallerhascreatedlinkstothe4.1.0libraryinthe
pleasemodifythelinkstopointtothedesiredlibraryandserverbinary.
之后,系统开始安装server组件,安装程序提示
Installingservercomponents...
24、 选择记录所有server的连接和断开连接
WouldyouliketologallserverConnects/Disconnects?
[yes]
默认回车确认
25、 选择TimesTen服务TCP端口,出现提示
WhatistheTCP/IPportnumberthatyouwanttheTimesTenServertolistenon?
[18003]
安装程序会提示一个默认端口,按照前面的方法确认这个端口没有被占用,如果占用则选择别的端口,输入正确的端口号,回车确认,出现提示
Startingthedaemon...
TimesTenDaemonstartupOK.
Installingclientcomponents...
26、 确认TimesTen服务安装的机器、端口、instance,出现提示
WhatisthenameofthehostrunningtheTimesTenserver?
[localhost]
安装程序将获取本机的hostname,默认回车确认。
确认TimesTen服务的端口,出现提示
WhatistheTCP/IPportnumberthattheTimesTenserverislisteningon?
[18003]
此处安装程序将默认选择上一步的端口,默认回车确认
确认TimesTen服务的instance,出现提示
WhatisthenameoftheinstancerunningtheTimesTenserver?
[tt70]
此处安装程序默认选择tt70,默认回车确认
安装程序提示
Creatingnew/timesten/TimesTen/tt70/info/sys.ttconnect.ini
Extracting3rdpartytools...
27、 不安装TimesTen文档,出现提示
Wouldyouliketoinstallthedocumentation?
[yes]no
输入no,回车确认,出现提示
Documentationnotinstalled.
Tomanuallyinstallthedocumentation,runthecommand'setup.sh-installDoc'
28、 安装结束,安装程序提示如下
NOTE:
TheTimesTendaemonstartup/shutdownscriptshavenotbeeninstalled.
Asroot,runthescript'set


- 配套讲稿:
如PPT文件的首页显示word图标,表示该PPT已包含配套word讲稿。双击word图标可打开word文档。
- 特殊限制:
部分文档作品中含有的国旗、国徽等图片,仅作为作品整体效果示例展示,禁止商用。设计者仅对作品中独创性部分享有著作权。
- 关 键 词:
- timesten 虚拟机 安装 步骤
 冰豆网所有资源均是用户自行上传分享,仅供网友学习交流,未经上传用户书面授权,请勿作他用。
 #2机组现场施工用电布置措施.docx
-
《个人贵金属质押借款合同》兴业银行.docx
-
《科学发展观和小康社会的经济建设》复习导学案.docx
-
《我和祖父的园子》第一课时教案两篇word.docx
-
《质量》教学案例与设计.docx
-
2惠农小册子.docx
-
7A版个人与团队模拟考试题及答案.docx
-
10篇新部编四年级下册语文课内外阅读理解专项练习题及答案.docx
-
16初四物理热和能知识点总结精讲.docx
-
20XX社会语言经典语录流行风暴.docx
-
48篇教学案例分析报告题.docx
-
《电子工厂安全管理制度汇总》.docx
-
《机械制造课程设计》指导.docx
-
《钱学森》教案第二课时.docx
-
《边城》读后感5篇.docx
-
《固定式压力容器安全技术监察规程》.docx
-
《论雷峰塔的倒掉》.docx
-
《手术台就是阵地》教学设计三年级语文下册.docx
-
《夏洛的网》课外阅读教学设计.docx
-
《自己的花是让别人看的》教案.docx
-
3C检查表090429.docx
-
7客运专线CRTSⅡ型板式无砟轨道施工工法.docx
-
《笔算除法》课时教案设计.docx
-
11#楼高大模板支撑体系专项方案.docx
-
17科学分析经济形势.docx
-
《电流和电路》易错题精讲综合检测题与答案.docx
-
《会计信息系统》习题含答案.docx
-
《汽车电器设备与维修》发电机分教考分离试题及标准答案.docx
-
《四川省排污许可证管理暂行办法》.docx
-
《新编实用英语》教案第一册Unit.docx
-
0母版锅炉值班员计算题WORD版.docx
-
3年级下册英语单词记忆人教版.docx
-
最新精品陕西省中考语文试题doc.docx
-
International Management.docx
-
EXCEL中如何将多个工作表的内容合并到一个表格中.docx
-
男人帮经典语句.docx
-
安福县事业单位教育类招聘试题及答案解析.docx
-
人教版七年级上期中语文卷.docx
-
题1.docx
-
《组织行为学》题库及客观题答案.docx
-
p5室内全彩LED显示屏方案.docx
-
最新量身定制高档女性情趣内衣用品电子商务创业计划书.docx
-
人教版四年级下册字词句总复习题库.docx
-
七年级地理教案《地图上的比例尺方向和图例》.docx
-
安徽省铜陵市铜官区农村信用社招聘试题及答案.docx
-
七年级上册数学知识点大全和复习提纲.docx
-
七年级历史教案设计.docx
-
云计算考试题库.docx
-
人教版小学英语六年级下册Unit 3 教案全3.docx
-
教科版五年级下册语文《美极了与糟透了》课件三篇.docx
-
人教版选修四化学学案第二章第三节化学平衡.docx
