 C#winform.docx
- 文档编号:24145790
- 上传时间:2023-05-24
- 格式:DOCX
- 页数:25
- 大小:222.77KB
C#winform.docx
《C#winform.docx》由会员分享,可在线阅读,更多相关《C#winform.docx(25页珍藏版)》请在冰豆网上搜索。
C#winform
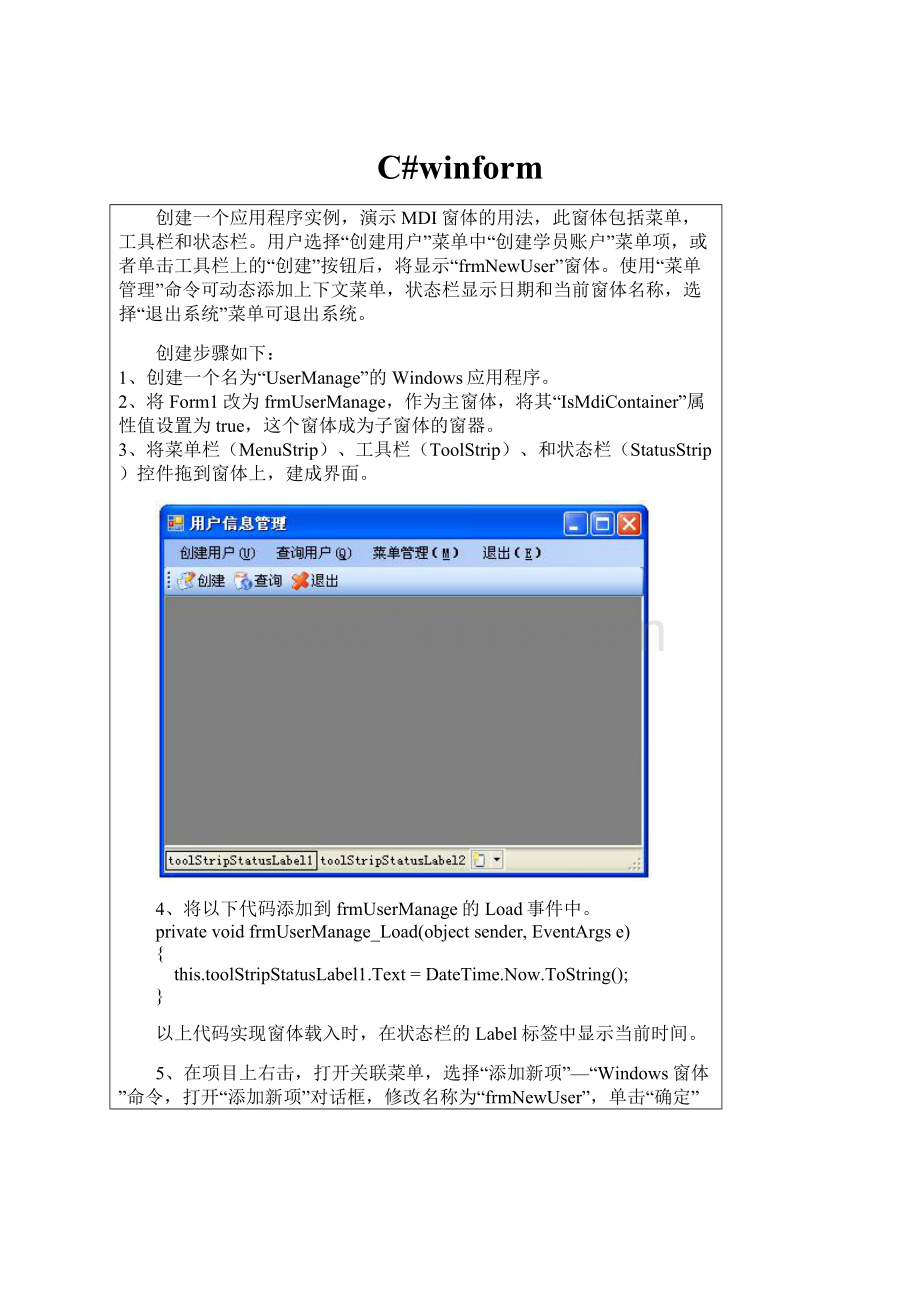
创建一个应用程序实例,演示MDI窗体的用法,此窗体包括菜单,工具栏和状态栏。
用户选择“创建用户”菜单中“创建学员账户”菜单项,或者单击工具栏上的“创建”按钮后,将显示“frmNewUser”窗体。
使用“菜单管理”命令可动态添加上下文菜单,状态栏显示日期和当前窗体名称,选择“退出系统”菜单可退出系统。
创建步骤如下:
1、创建一个名为“UserManage”的Windows应用程序。
2、将Form1改为frmUserManage,作为主窗体,将其“IsMdiContainer”属性值设置为true,这个窗体成为子窗体的窗器。
3、将菜单栏(MenuStrip)、工具栏(ToolStrip)、和状态栏(StatusStrip)控件拖到窗体上,建成界面。
4、将以下代码添加到frmUserManage的Load事件中。
privatevoidfrmUserManage_Load(objectsender,EventArgse)
{
this.toolStripStatusLabel1.Text=DateTime.Now.ToString();
}
以上代码实现窗体载入时,在状态栏的Label标签中显示当前时间。
5、在项目上右击,打开关联菜单,选择“添加新项”—“Windows窗体”命令,打开“添加新项”对话框,修改名称为“frmNewUser”,单击“确定”按钮。
窗体界面如下:
6、将以下代码添加到“创建学生用户的菜单”中
privatevoid创建学生用户ToolStripMenuItem_Click(objectsender,EventArgse)
{
frmNewUseruser=newfrmNewUser();
user.MdiParent=this;
user.WindowState=FormWindowState.Maximized;
user.Show();
this.toolStripStatusLabel2.Text=this.ActiveMdiChild.ToString();
}
以上代码实现选择“创建学生用户”菜单时,打开frmNewUser窗体,作为子窗体打开,并在主窗体的状态栏中显示当前活动窗体的信息。
7、将以下代码加到“退出”菜单项和工具栏的“退出”按钮中。
privatevoid退出EToolStripMenuItem_Click(objectsender,EventArgse)
{
Application.Exit();
}
8、将以下代码添加到“用户管理”菜单项的Click事件中。
privatevoid用户管理ToolStripMenuItem_Click(objectsender,EventArgse)
{
ContextMenuStripmnuContext=newContextMenuStrip();
this.ContextMenuStrip=mnuContext;
mnuContext.Items.Add("创建用户");
mnuContext.Items.Add("查询用户");
mnuContext.Items.Add("退出系统");
}
该代码用于动态创建应用程序上下文菜单。
9、对于实现的功能键,添加一个提示信息,代码如下:
privatevoidtoolStripButton2_Click(objectsender,EventArgse)
{
MessageBox.Show("正在建设中");
}
编译并运行,首先出现的是主窗体,单击“创建”按钮,frmNewUser窗体作为子窗体显示在主窗体中。
C#winForm将窗体状态栏StatusStrip示例(显示当前时间)
实现效果:
通过StatusStrip显示窗体状态栏,同时将状态栏分成三部分:
居左边显示相关文字信息,中间空白显示,居右边显示时间信息。
1.创建窗体及添加StatusStrip
默认StatusStrip名称为statusStrip1
2.在statusStrip1的Items属性中
添加三个StatusLabel
默认名称为toolStripStatusLabel1,2,3
按1,2,3的顺序排列
3.修改toolStripStatusLabel1的Text属性
为相关文字如"欢迎使用本系统"
4.修改toolStripStatusLabel2的Text属性为空
Sprint属性为True
BorderSides属性为Left,Right
5.修改toolStripStatusLabel3的Text属性为空
在Form的Load事件中修改其显示为当前时间
this.toolStripStatusLabel3.Text="登录时间:
"+DateTime.Now.ToString("yyyy-MM-ddhh:
mm:
ss");
6.如果要使状态栏时间信息随操作系统当前时间不停的改变
则可以通过增加Timer控件来实现
增加Timer控件timer1
编写其Tick事件为
privatevoidtimer1_Tick(objectsender,EventArgse)
{
this.toolStripStatusLabel3.Text="系统当前时间:
"+DateTime.Now.ToString("yyyy-MM-ddhh:
mm:
ss");
}
在Form的Load事件中对timer1进行相关设置
privatevoidMainForm_Load(objectsender,EventArgse)
{
this.toolStripStatusLabel3.Text="系统当前时间:
"+DateTime.Now.ToString("yyyy-MM-ddhh:
mm:
ss");
this.timer1.Interval=1000;
this.timer1.Start();
}
C#windows服务中的Timer控件的使用
C#windows服务程序中的Timer控件的使用是什么情况呢?
那么本文就C#windows服务程序中的Timer控件的使用问题向你介绍相关的操作。
C#windows服务程序中的Timer控件的使用问题是如何解决的呢?
今天和同事一起研究了下C#windows服务程序中的Timer控件的使用的写法.
我们在建立一个C#windows服务程序后,要用到计时器的话一般都会想到Timer控件,于是到工具器把Timer控件拉过来,双击写事件,设置时间,哇,成功了....
但服务一跑起来,唉,怎么回事,时间到了怎么没有执行事件呢?
后来,我找很多资料才知道,这个Timer控件是winForm下的,不能用在C#windows服务程序中.
怎么办呢.......
打开"工具箱"---右键---"选择项"---找到Timer控件,看好了,这个Timer控件的是system.Timer下的.可不是System.Windows.Form.然后添加.
双击...写事件...
OK,搞定
C#windows服务程序中的Timer控件的使用的相关操作就向你介绍到这里,希望对你了解C#windows服务程序中的Timer控件的使用有所帮助。
WindowsForms高级界面组件-Timer控件实例
要求显示计算机运行的时间长度和应用程序运行的时间长度,界面如图
代码如下:
usingSystem;
usingSystem.Drawing;
usingSystem.Collections;
usingSystem.ComponentModel;
usingSystem.Windows.Forms;
usingSystem.Data;
namespaceExample_1
{
///
///SummarydescriptionforForm1.
///
publicclassfrmTickCounter:
System.Windows.Forms.Form
{
privateSystem.Windows.Forms.LabellblComputer;
privateSystem.Windows.Forms.LabellblApplication;
privateSystem.Windows.Forms.GroupBoxgrpElapsed;
privateSystem.Windows.Forms.ButtonbtnClose;
privateSystem.Windows.Forms.TimertmrTickTimer;
privateSystem.ComponentModel.IContainercomponents;
privateintcompuTime;
publicfrmTickCounter()
{
InitializeComponent();
}
///
///Cleanupanyresourcesbeingused.
///
protectedoverridevoidDispose(booldisposing)
{
if(disposing)
{
if(components!
=null)
{
components.Dispose();
}
}
base.Dispose(disposing);
}
#regionWindowsFormDesignergeneratedcode
///
///RequiredmethodforDesignersupport-donotmodify
///thecontentsofthismethodwiththecodeeditor.
///
privatevoidInitializeComponent()
{
ponents=newSystem.ComponentModel.Container();
this.grpElapsed=newSystem.Windows.Forms.GroupBox();
this.lblApplication=newSystem.Windows.Forms.Label();
this.lblComputer=newSystem.Windows.Forms.Label();
this.btnClose=newSystem.Windows.Forms.Button();
this.tmrTickTimer=newSystem.Windows.Forms.Timer(ponents);
this.grpElapsed.SuspendLayout();
this.SuspendLayout();
//
//grpElapsed
//
this.grpElapsed.Controls.Add(this.lblApplication);
this.grpElapsed.Controls.Add(this.lblComputer);
this.grpElapsed.Font=newSystem.Drawing.Font("MicrosoftSansSerif",9.75F,System.Drawing.FontStyle.Bold,System.Drawing.GraphicsUnit.Point,((System.Byte)(0)));
this.grpElapsed.Location=newSystem.Drawing.Point(8,8);
this.grpElapsed.Name="grpElapsed";
this.grpElapsed.Size=newSystem.Drawing.Size(600,120);
this.grpElapsed.TabIndex=0;
this.grpElapsed.TabStop=false;
this.grpElapsed.Text="开机时长";
//
//lblApplication
//
this.lblApplication.Location=newSystem.Drawing.Point(16,72);
this.lblApplication.Name="lblApplication";
this.lblApplication.Size=newSystem.Drawing.Size(576,26);
this.lblApplication.TabIndex=1;
//
//lblComputer
//
this.lblComputer.Location=newSystem.Drawing.Point(16,32);
this.lblComputer.Name="lblComputer";
this.lblComputer.Size=newSystem.Drawing.Size(576,26);
this.lblComputer.TabIndex=0;
//
//btnClose
//
this.btnClose.Location=newSystem.Drawing.Point(488,136);
this.btnClose.Name="btnClose";
this.btnClose.Size=newSystem.Drawing.Size(115,26);
this.btnClose.TabIndex=1;
this.btnClose.Text="关闭";
this.btnClose.Click+=newSystem.EventHandler(this.btnClose_Click);
//
//tmrTickTimer
//
this.tmrTickTimer.Enabled=true;
this.tmrTickTimer.Interval=20;
this.tmrTickTimer.Tick+=newSystem.EventHandler(this.tmrTickTimer_Tick);
//
//frmTickCounter
//
this.AutoScaleBaseSize=newSystem.Drawing.Size(6,14);
this.ClientSize=newSystem.Drawing.Size(616,173);
this.Controls.Add(this.btnClose);
this.Controls.Add(this.grpElapsed);
this.Name="frmTickCounter";
this.Text="时钟";
this.Load+=newSystem.EventHandler(this.frmTickCounter_Load);
this.grpElapsed.ResumeLayout(false);
this.ResumeLayout(false);
}
#endregion
///
///Themainentrypointfortheapplication.
///
[STAThread]
staticvoidMain()
{
Application.Run(newfrmTickCounter());
}
privatevoidfrmTickCounter_Load(objectsender,System.EventArgse)
{
compuTime=Environment.TickCount;
}
privatevoidtmrTickTimer_Tick(objectsender,System.EventArgse)
{
//Environment类提供有关当前环境和平台的信息以及操作它们的方法
longcurTickValue=Environment.TickCount;
longdifference=curTickValue-compuTime;
longcomputerHours,computerMinutes,computerSeconds;
longapplicationHours,applicationMinutes,applicationSeconds;
//convertingmillisecondsintohours,minutesandsecondscomputerHours=(curTickValue/(3600*999))%24;
computerHours=(curTickValue/(3600*999))%24;
computerMinutes=(curTickValue/(60*999))%60;
computerSeconds=(curTickValue/999)%60;
applicationHours=(difference/(3600*999))%24;
applicationMinutes=(difference/(60*999))%60;
applicationSeconds=(difference/999)%60;
this.lblComputer.Text=String.Format("本计算机已运行了{0}小时{1}分{2}秒",computerHours.ToString(),computerMinutes.ToString(),
computerSeconds.ToString());
this.lblApplication.Text=String.Format("本应用程序已运行了{0}小时{1}分{2}秒",
applicationHours.ToString(),applicationMinutes.ToString(),
applicationSeconds.ToString());
}
privatevoidbtnClose_Click(objectsender,System.EventArgse)
{
this.Close();
}
}
}
以上代码是别人源码,我虽然在机器上运行过,但对其每行的意义不是很了解,希望朋友们多多指导!
WindowsForms高级界面组件-Timer控件
Timer控件提供了一种可在程序运行时操控时间的机制。
它是一种非可视化控件,不向用户提供用户界面,因此在运行时不会显示在界面上。
它类似与时钟,在指定的时间间隔不断记时,时间一到即触发事件,执行预设的动作。
Timer控件的主要属性
Enabled:
用于设置是否启用定时器
Interval:
设置时钟周期,单位ms
Timer控件的主要事件
Tick:
:
设定的时间到,触发该事件
Timer控件的主要方法
Start():
启动时钟进行计时。
Stop():
停止时钟
Interval属性用来决定每隔多长的时间要引发回送,其设置值的单位是毫秒(也就是千分之一秒),默认值则是60000毫秒,也就是60秒。
这里需要大家注意的是,将Timer控件的Interval属性设置成较小的值会使得回送频率增加,也很容易使得Web服务器的流量大增,对整体资源耗用与效率都会造成不良的影响。
因此尽量在确实需要的时候使用Timer控件来定时更新页面上的内容。
每当Timer控件的Interval属性所设置的间隔时间到达而进行回送时,就会在服务器上引发Tick事件。
我们通常会为Tick事件处理函数编写程序代码,以便能够根据自己的需求来定时执行特定操作。
另外一个常用的属性就是Enabled,用户可以将Enabled属性设置成false以便让Timer控件停止计时,而当需要让Timer控件再次开始计时的时候,只需再将Enabled属性设置成True即可。
Timer控件在UpdatePanel控件的内外是有区别的。
当Timer控件在UpdatePanel控件内部时,JavaScript计时组件只有在一次回传完成进才会重新建立。
也就说直到网页回传之前,定时器间隔时间不会从头计算。
例如,用户设置Timer控件的Interval属性值为6000ms(6s),但是回传操作本身却花了2s才完成,则下一次的回传将发生在前一次回传被引发之后的8s。
而如果Timer控件位于UpdatePanel控件之外,则当回传正在处理时,下一次的回传仍将发在前一次回传被引发之后的6s。
也就是说,UpdatePanel控件的内容被更新之后的4s,就会再次看到该控件被更新。
C#解决StatusStrip控件上的项目不能靠右对齐的问题
在C#中用到了状态栏控件StatusStrip,但当我想把StatusStrip上某个StatusLabel靠右对齐时出了问题。
按照MSDN中的办法,是设置ToolStripStatusLabel的Alignment属性为Right。
不过我在设计界面的属性窗口中找不到Alignment。
就算加入代码toolStripStatusLabel2.Alignment=ToolStripItemAlignment.Right;也还是没什么效果。
后来我找到两种方法解决这个问题:
方法一:
在状态栏所有项目(StatusLabel、ProgressBar、DropDownButton等)前添加一个空白的StatusLabel(Text属性为空),并将其Spring属性设为True。
Spring属性的作用是设置该项是否填满剩余空间,设为True以后,


- 配套讲稿:
如PPT文件的首页显示word图标,表示该PPT已包含配套word讲稿。双击word图标可打开word文档。
- 特殊限制:
部分文档作品中含有的国旗、国徽等图片,仅作为作品整体效果示例展示,禁止商用。设计者仅对作品中独创性部分享有著作权。
- 关 键 词:
- winform
 冰豆网所有资源均是用户自行上传分享,仅供网友学习交流,未经上传用户书面授权,请勿作他用。
 《当代世界政治与经济》.docx
-
《背起爸爸上学》观后感5篇精品模板.docx
-
《个人能力提升计划》.docx
-
《教务管理课程管理系统》系统分析实验报告docx.docx
-
《弟子规》全文带拼音.docx
-
《海底两万里》名著导读及检测试题教学内容.docx
-
《氓》导学案答案.docx
-
《吞食天地2诸葛孔明传》完全攻略.docx
-
《再见了母校》诗歌朗诵稿6篇范文.docx
-
《铸造工艺说明书》word版.docx
-
12Unit9TheDamnedHumanRace.docx
-
27魏利金主讲郑州关于举办建筑结构设计疑难问题及结构施工图设计及审图常见问题专题1.docx
-
《电力建设工程质量监督检查典型大纲》风力发电部分.docx
-
《和孩子划清界限》读书笔记.docx
-
《莫泊桑小说两篇》doc.docx
-
《网络设备安装配置与调试》试题B卷.docx
-
《安全生产技术》第一章第一节.docx
-
《高级计算机网络》课程综述.docx
-
《检验核医学》教学大纲.docx
-
《大学英语》第6段段落与课文翻译.docx
-
《构造地质学》作图题例题.docx
-
《流体力学与热工基础》教学大纲重点难点.docx
-
《索证索要制度》.docx
-
《中医临床护理学》试题库及答案六.docx
-
2汽车装配工艺及调试技术10页word.docx
-
5 草船借箭教案.docx
-
《管理会计》试题库选择.docx
-
《麻雀》教案.docx
-
《砼渗水整改措施》.docx
-
《语言学纲要》 叶蜚声徐通锵版复习.docx
-
《产品质量法》培训.docx
-
《工程招投标与合同管理》期末考试复习题及参考答案.docx
-
河南省南阳市高一地理下学期期末考试试题整理.docx
-
金融学期末复习题及答案.docx
-
人力资源管理概论复习.docx
-
汉语言文学实习心得体会.docx
-
导学互动.docx
-
回顾往事的句子.docx
-
临床执业助理医师百题冲刺.docx
-
精彩段落摘抄大全精彩片段摘抄.docx
-
人物传记8篇.docx
-
硫磺安全系统技术说明书.docx
-
工地参观学习心得体会.docx
-
明尼苏达多相人格测验MMPI.docx
-
扬州苏北人民医院奖金分配制度改革.docx
-
电厂各种违章行为汇总.docx
-
河北衡水中学的管理制度.docx
-
六年级下册语文按要求写句子复习专项题.docx
-
可以形容爱情的句子.docx
-
柔性直流输电技术徐政等.docx
-
邻里花园企划推广方案修改稿.docx
